“Most of my photos are grounded in people, I look for the unguarded moment, the essential soul peeking out, experience etched on a persons face.” — Steve McCurry

Gina DeLucca at Blues Jam.
It has been a long-time since my last entry. I have been busy and doing a lot of photography but either I thought it would not have general interest or wasn’t quite ready to talk about it. I think (hope) that split-toning black and white (monochrome) photos may be of at least some general interest.
Split-toning adds different color hues to the highlights and shadows. Typically the highlights are warmed (reds and yellows) and the shadows are cooled (blue and cyan). This was commonly done in the “old days” of wet chemistry using different chemicals to add the tones. The way to do split-toning is more obvious in Lightroom which has a split-toning panel in the Develop module than in PS. However, in Photoshop you can easily use the Color Balance adjustment layer to achieve a split-tone image.
How much you tone and what colors you use is strictly a personal artistic judgement and will vary from image to image. The starting values I used in Color Balance for the image above are:
Highlights: +30 Red; -75 Yellow
Shadows: +10 Red; +11 Blue
Midtones: -40 Cyan
Highlights, shadows and midtones are picked from a drop down menu in the Color Balance dialog box.
For the image above I also used the “increased contrast” curve in the Curves adjustment layer.
 I make the best possible black white image to start. Many folks like to use the NIK Silvereffects presets as a starting point. I checked out the presets and thought NOIR 1 wasn’t bad for the image above, but preferred what I could do directly in the BW adjustment layer. Final tweaks, a little sharpening and you are good to go!
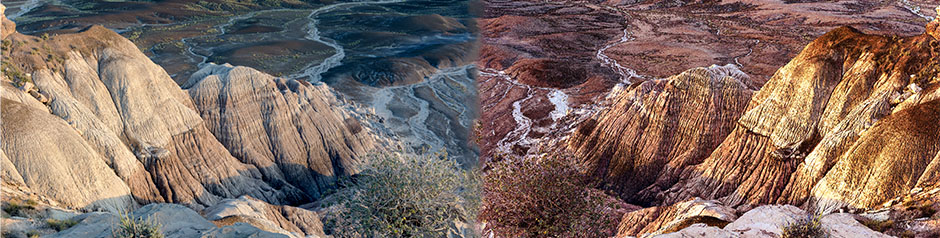
The second image was processed similarly, but ended up with
Highlights: +32; Red; -72 Yellow
Shadows: +14 Red; +9 Blue
Midtones: -40 Cyan
I also vignetted (darkened) the edges significantly using a separate layer with blending mode set to overlay and painting with black.
There are at least two additional ways to approach split-toning. In more recent versions of Photoshop you can apply a camera raw filter and even do it as a smart filter so you can go back and modify the tones. Split-toning is the fifth option from the left at the top right of the camera raw dialog.
A third way is to select highlights or shadows in Color Range. An advantage to using color range is that you broaden or narrow the highlights or shadows using the fuzziness and range sliders. This will create a selection when you select HSL or color balance adjustment layers.
Split-toning can be used with color or monochrome to further separate and accent highlights and shadows. Go play!
This is the first time I have visited your site and I really like your use and explanation about Split-toning. I am NOT an artist by any means, but the two images presented here really appealed to me. Therefore, I will copy and paste your description of how you created each in LR for future use. I have just installed LR5 and am working to import my images, then keyword them. A full summer’s job, I expect. However, I will not forget to try this new technique once I complete the basics in LR. Thanks so much for sharing this information, AND for creating your wetland type of garden too. When we had a house in Silver Spring, I had one of those and it was really great for trying to photograph bees, hummingbirds, and butterflies. Now we live in Leisure World and the only garden space I can rent are two 12’x17′ garden plots across the street from our condo building.
However, as I was writing this I got the idea that next year, in my new (1st year) plot I will strongly consider changing it to a wetland plot on your model. Even before the past few days of “near monsoons” here, that plot was very soggy, nearly killing my tomato and pepper plants.