“The secret of a good photograph—which, like a work of art, can have esthetic qualities—is its realism … Let us therefore leave art to artists and endeavor to create, with the means peculiar to photography and without borrowing from art, photographs which will last because of their photographic qualities.” — Albert Renger-Patzsch
High Dynamic Range photography combines multiple images with bracketed exposures to compress the brightness range of scenes where very bright areas and very dark exceed the capture range of the sensor. In such scenes an average exposure might result in shadow or highlight areas without detail (highlights completely “blown out.)”
With film, if there were foreground/background brightness differences, such scenes might have been clumsily handled with a graduated neutral density filter (of course grad filters can also work for digital photography, but HDR is far more flexible). These filters would have half their areas darkened by the equivalent of 1, 2 or 3 stops with a neutral gray that wouldn’t change colors or tones, and the remainder clear. If you had for example a sunset that was sufficiently bright that a proper exposure left the foreground dark, you could use this filter to hold back light from the sky and even out the exposure. This worked fairly well where you had a straight horizon, but not so well in more complex situations. Another solution to long tonal range was to “expose for the shadows and develop for the highlights,” which worked well for black and white film but not so much for transparencies. Using flash or fill flash and dodging and burning in the darkroom were other means of handling scenes with long tonal values.
One of the draw backs of HDR is that the subject and camera need to be still or you capture the movement through the bracket set. This is called ghosting. A common ghosting problem for example is the movement of clouds in the sky. Several of the programs that do HDR can now handle some ghosting by allowing you to pick a particular exposure from the set to use for areas that exhibit movement.
A typical DSLR sensor can capture a range of about 9 stops. Black and white negative film can capture about 13 stops and a view through a window from a dim interior to bright sunlight would be about 12-14 stops. On the other side of the process, the best possible paper is going to able to portray only about 7 stops (Freeman). So somewhere in the process there is need to compress the brightness range of high dynamic range images.
When planning to shoot for HDR processing it is very helpful if you have tripod so that the images, especially those with the longest shutter speeds can be properly aligned. If you don’t have a tripod, increase your ISO if possible so that even the longest exposures will be steady (this will add noise to your darkest exposure). Bracing against a solid object such as a fence post or tree can also help to avoid camera movement. Setting up an auto bracket now becomes more important so you don’t move the camera to make adjustments, but can just press the shutter the requisite number of times.
Set your exposure to manual and adjust the exposure using only the shutter speed. If you change the f-stop, the foreground/background focus may change, decreasing sharpness in the final image or making alignment more difficult.
The number of exposures will be dependent on the total range over which you make your exposures and the steps in between. Being sure to fully capture shadows and highlights will determine the range. Usually steps of 2 stops will be sufficient. You can start with your shortest exposures (the histogram is bunched to the left) so that the rightmost histogram values are to the left of the center of the axis. Lengthen your shutter speed in two stop increments (expose to the right) until the histogram is bunched up on the right and the leftmost values are to the right of the center of the axis.
To facilitate processing in Photoshop, I shoot my hand at the beginning and end of each sequence to make it easier to see where the sequence begins and ends. When naming the files I use a scene name, followed by the number of the HDR sequence for that scene, followed by a letter for the frame sequence. This can be done automatically in Batch Rename under the tools menu. So for example The first pan of a river gorge scene might be RiverGorgeHDR1a, RiverGorgeHDR1b, RiverGorgeHDR1c. If I shot a second pan sequence it would be RiverGorgeHDR2a, RiverGorgeHDR2b, etc. When naming the final merged image it would be, for example, River GorgeHDR2, which would enable to go back to the original HDR sequence of images if I ever needed to.
I usually shoot in RAW, so to begin I select the images in Bridge and double click on one to open them all in camera RAW. I make lens and chromatic aberration corrections from the lens corrections tab. I then make other global changes such as exposure, saturation or clarity. I don’t make local corrections such as spot removal. Then “select all” on the left and then synchronize. Click OK if you have not made local corrections; if you have, just unclick those such as spot removal or local corrections. This will make the same changes to all of the images so they remain consistent. Then in Photoshop click Alt-open to Open copies. Photoshop will open all of the images.
When that is complete, File > Automate > Merge to HDR. Click “Add Open Files.” “Attempt to Automatically Align Source Images” should be selected by default and click OK. Photoshop will open a dialog box with the merged image and the component images across the bottom indicating the relative exposure.
In the upper left corner is a check box to “Remove Ghosts” – click that because even on a tripod there might be slight movement from the mirror slap or pressing the shutter. Just below the Ghost checkbox it will provide options for Mode: 8, 16 or 32 bit. I generally leave it on 16, unless my camera only took 8-bit images, then there is no advantage to 16 bit. Next to mode are the tone mapping options. Local adaptation is generally most useful and comes up by default. Highlight compression produces a relatively flat image that might be useful in some instances with additional processing after generating the HDR. Under Tone and Detail I usually tweak the detail up a bit and hold off on Gamma and Exposure until I am done with “Curve.” The curve can be used like a curve adjustment layer. If you click on “Advanced” you can use simple sliders to adjust Shadows, Highlights, Vibrance and Saturation. Click OK to create the merged image, and editing according to your own workflow from there.
After Google bought NIK, they offered a good deal on a package of NIK software that included HDREfexPro 2 which also offers HDR and tone mapping tools. Again open your files and make global corrections. Open HDREfexPro 2 and click on “Add open files.” Smart Object will be checked by default. If you want to generate the HDR as a Smart Object then click on “Merge dialog.” However, as a Smart Object you won’t have access to curves, contrast or an overlay adjustment layers in the final HDR image. Since there were relatively few changes to make in the HDR dialog, I would not generally expect to go back, and wouldn’t open as a Smart Object so I have more flexibility for subsequent adjustments.
The ensuing dialog has some similarities to PS, with a large rendering of the HDR image and small images showing the range of images used. An option is not offered for different tone operators, but an option is provided for correcting chromatic aberrations which can occur as a result of the tone mapping. If you see aberrations, correct then, otherwise click “Create HDR.” HDR Efex Pro gave a much different result then PS, with a much flatter image and both the shadows and highlights brought toward the midtones. I thought the image less interesting than the PS result, but could make subsequent changes. Clicking OK opened the image back in PS as a 32-bit TIFF file.

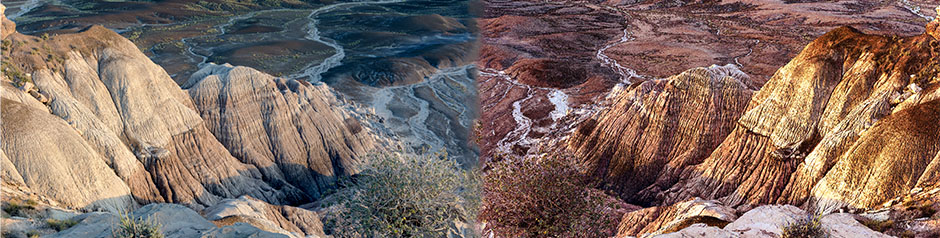
This is the best single image corrected with typical local and global controls, including selection and darkening of the sky, overlay, etc.

This image is the Photoshop HDR result.

This is the NIK HDR result, and

This is the NIK HDR modified by normal workflow after generation of the HDR. You can see that the detail in the shadows is increased for both the cliff and the river.
Michael Freeman, Mastering HDR Photography, Amphoto Books, 2008)